
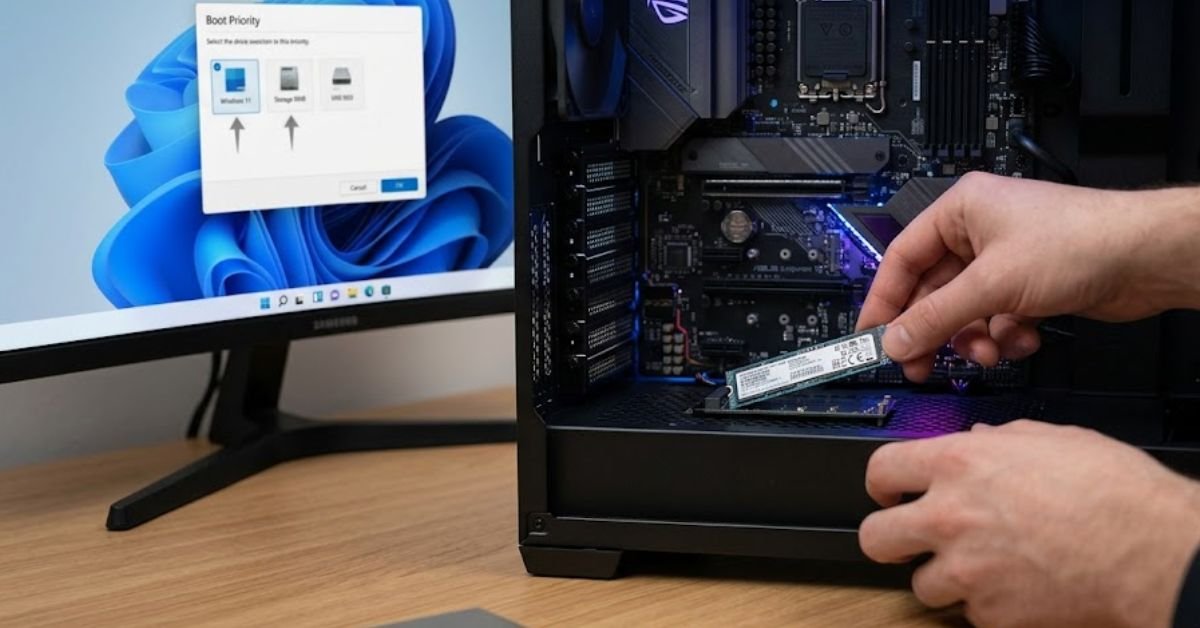
Upgrading your PC’s storage by adding a blisteringly fast M.2 NVMe SSD or a secondary high-capacity hard drive is one of the most rewarding hardware improvements you can make. However, physical installation is only half the battle. Simply sliding a brand-new drive into its slot or plugging in a SATA cable will not magically make Windows 11 boot from it.
By default, your computer’s motherboard continues searching for an operating system on the legacy drive it already knows. If you want your PC to load Windows 11 instantly from your upgrade drive, or if you need to run a clean installation from a USB flash drive, you must explicitly update your system’s boot order.
This definitive, step-by-step guide walks you through every stage of changing your boot drive in Windows 11—from pre-installation drive initialization to UEFI/BIOS tweaks and dual-boot management.
Preparation: Clone, Install, or Initialize Your New Drive
Before configuring your motherboard hardware to prioritize a new drive, that target drive must actually possess a bootable partition containing an operating system. If you attempt to boot directly into a completely blank, unformatted SSD, your system will throw a “No Bootable Device Found” error or boot straight back into UEFI settings.
You generally have two paths when setting up your new drive:
- Cloning Your Old Drive: Software like Macrium Reflect or Hasleo Disk Clone creates an exact bit-for-bit duplicate of your original drive. This copies your active Windows 11 installation, custom desktop settings, personal files, and installed software without forcing you to start from scratch.
- Clean Installation: Using a bootable USB drive created with Microsoft’s official Media Creation Tool, you wipe the slate clean and install a fresh copy of Windows 11 onto the target drive.
| Task Metric | Disk Cloning | Clean Installation |
| Best For | Hardware upgrades without software reinstallation | Fresh start, clearing accumulated system bloat |
| Average Time | 15–45 minutes (depends on SSD speeds) | 1–2 hours (requires app reinstallations) |
| Data Preservation | Retains all original files, apps, and registries | Erases existing target drive partitions |
| Prerequisites | Cloning software & connection adapter | 8GB+ USB flash drive & Windows Media Tool |
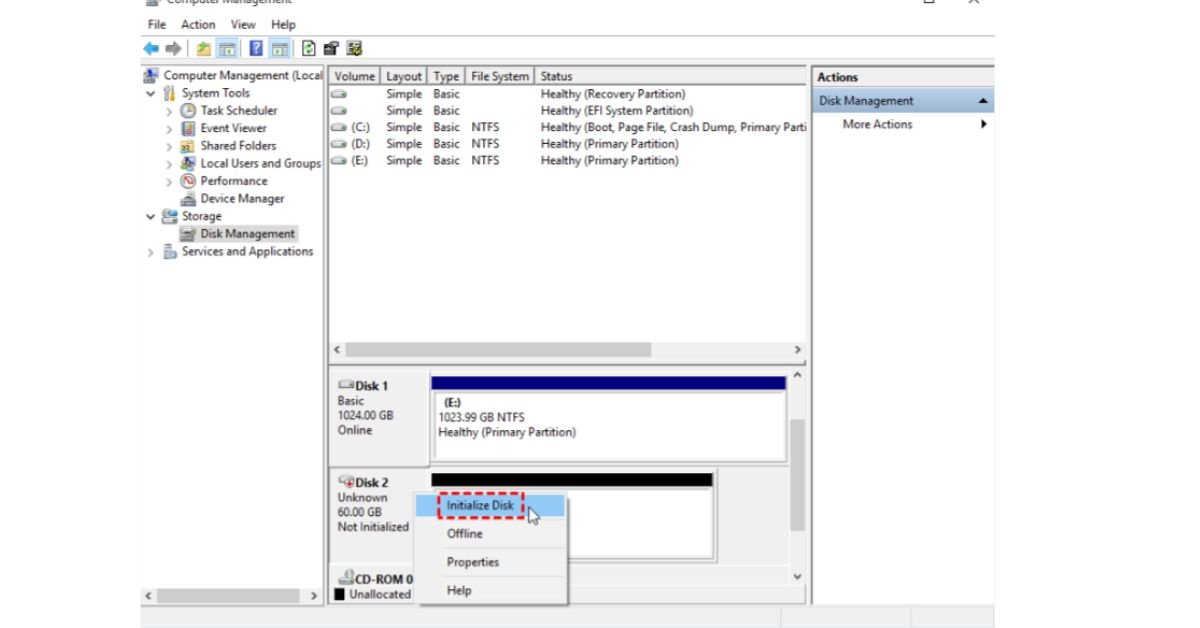
If you are setting up a brand-new internal drive inside Windows before cloning, open Disk Management (press Win + X and select Disk Management). If prompted, initialize the disk using GPT (GUID Partition Table) rather than MBR, as Windows 11 strictly mandates GPT for modern UEFI startup compliance.
Method 1: Change Boot Drive via Windows 11 Advanced Startup
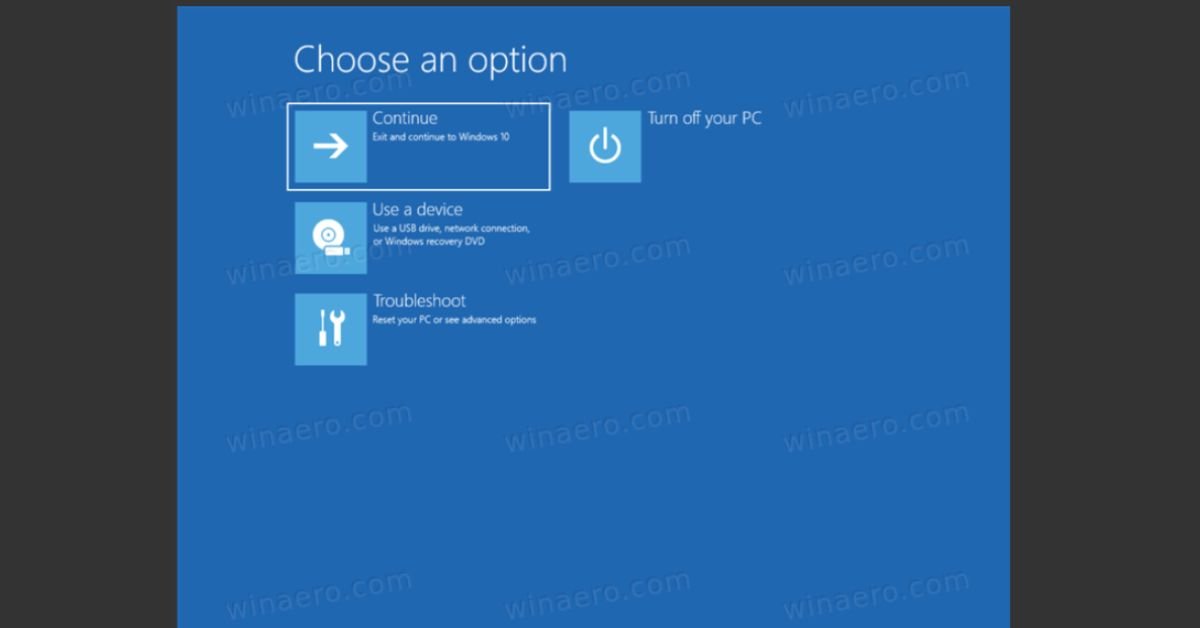
Modern motherboards boot so rapidly that hitting the correct keyboard shortcut (like Del or F2) during startup can be frustrating. Fortunately, Windows 11 includes a direct software route to restart your computer straight into the UEFI firmware environment.
1.Open Windows Recovery Settings:No key-mash timing required during system POST.
Press Windows Key + I to open the main Settings application. Click System on the left menu rail, scroll down the right-side panel, and select Recovery.
2.Trigger Advanced Startup:Save open work before proceeding.
Locate the Advanced startup row and click the Restart now button. Confirm the warning dialog to reboot your machine immediately.
3.Navigate the Blue Recovery Environment:Access underlying motherboard configuration options.
When your system reboots into the blue recovery screen, select Troubleshoot > Advanced options > UEFI Firmware Settings. Click Restart to confirm.
4.Reorder the Hardware Boot Priority:Set your primary Windows SSD to position #1.
Once inside UEFI, navigate to the Boot, Boot Priority, or Boot Order menu using your arrow keys or mouse pointer. Drag or move your new target drive (or its Windows Boot Manager entry) to the top position.
5.Save Configuration and Exit:Applies non-volatile changes to motherboard EEPROM.
Press F10 to save settings and exit. Your PC will restart and load Windows 11 directly from your primary selected drive.
Method 2: Change Boot Order Directly via BIOS/UEFI Hotkeys
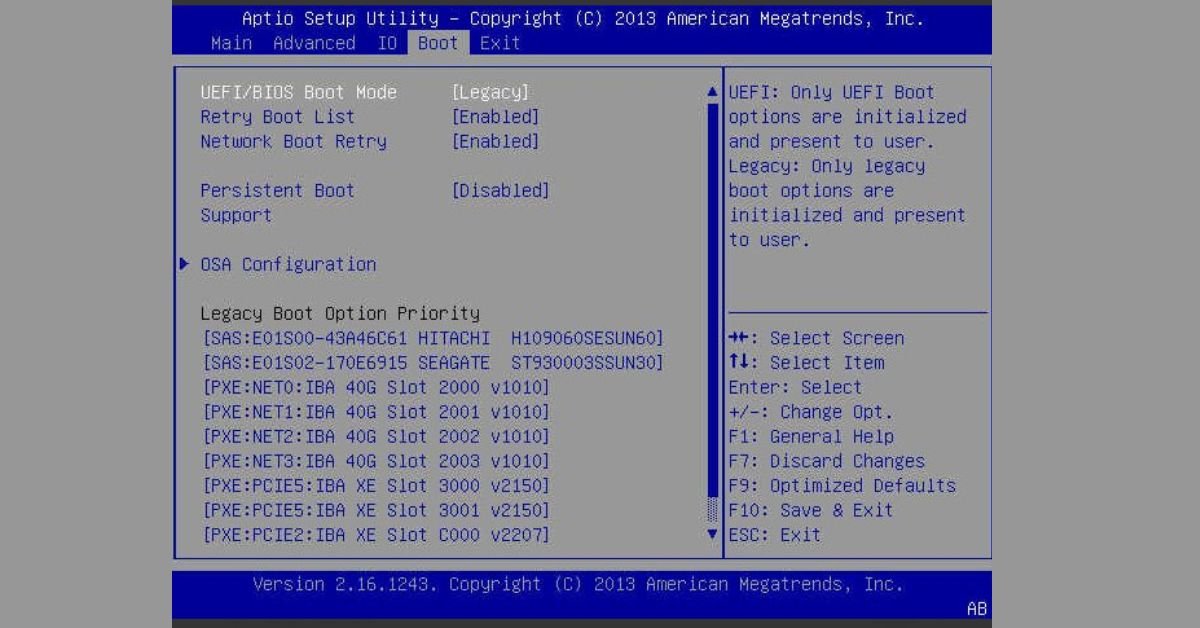
If your current primary drive crashed or you are trying to boot a non-working system using a Windows 11 recovery USB stick, you cannot access Windows settings. In this scenario, you must access UEFI setup screens using hardware hotkeys during startup.
Common Motherboard and Laptop BIOS Keys
Motherboard brands use varying hotkeys to trigger UEFI setup. Below is a breakdown of primary BIOS keys and temporary Boot Menu keys across popular manufacturers:
| Device / Motherboard Brand | Dedicated BIOS/UEFI Key | One-Time Boot Menu Key |
| ASUS | F2 or Delete | F8 |
| Dell | F2 | F12 |
| HP | F10 or Esc | F9 |
| Lenovo | F2 or Fn + F2 | F12 |
| MSI | Delete | F11 |
| Gigabyte / AORUS | Delete | F12 |
| ASRock | Delete or F2 | F11 |
Step-by-Step Manual BIOS Adjustment
- Power down your computer completely.
- Press the power button and immediately start tapping the dedicated BIOS key repeatedly (approximately twice per second) until the motherboard logo screen disappears and the setup screen loads.
- If you enter an “EZ Mode” summary dashboard, press F7 to switch to Advanced Mode.
- Use the arrow keys to select the Boot tab along the top navigation bar.
- Search for Boot Option Priorities or Boot Option #1.
- Highlight Boot Option #1 and press
Enter. Select your new SSD or Windows Boot Manager associated with that drive. - Ensure Secure Boot remains set to Enabled under the security settings, as Windows 11 will refuse to boot if Secure Boot features are disabled in native UEFI mode.
- Press F10, select Yes to save changes, and allow the machine to complete its startup cycle.
Method 3: Change Default Boot Drive in Dual-Boot Configurations
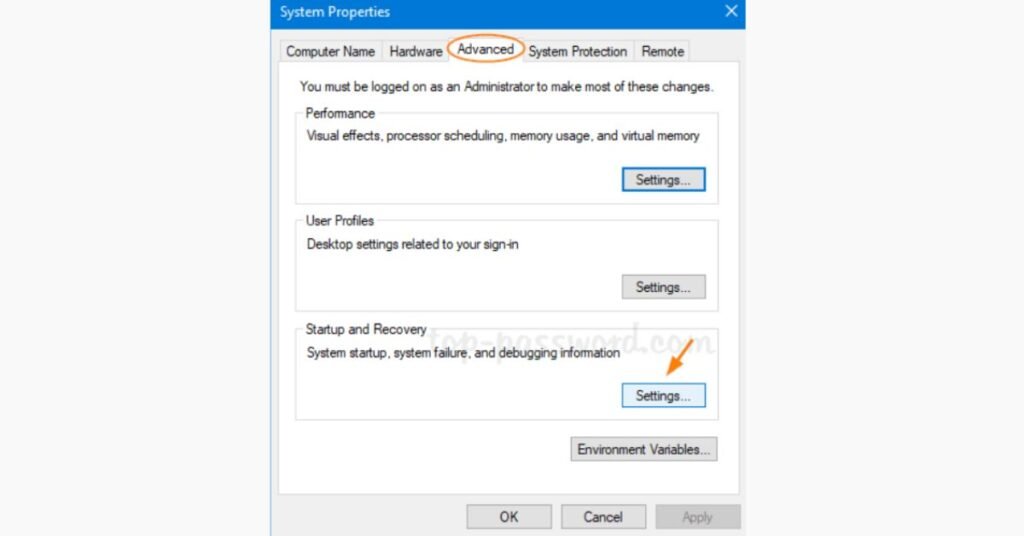
If you have two separate physical drives installed in your machine and both hold bootable installations of Windows (for example, Windows 11 for personal daily use on SSD 1 and a secondary Windows 11 workspace setup on SSD 2), you don’t need to jump into BIOS every time you want to switch defaults. You can adjust default boot parameters directly within the operating system GUI.
Option A: Using Startup and Recovery Properties
- Press Windows Key + R on your keyboard to launch the Run dialog box.
- Type
sysdm.cplinto the text field and hit Enter to open System Properties. - Select the Advanced tab located at the top of the properties box.
- Locate the Startup and Recovery section near the bottom and click Settings…
- Click the Default operating system drop-down menu and choose your preferred primary Windows installation.
- Check the box labeled Time to display list of operating systems and set a duration (e.g., 5 seconds). This gives you a clean menu prompt on startup to choose your secondary drive whenever desired.
- Click OK twice to apply your preferences.
Option B: Using System Configuration (msconfig)
- Press Windows Key + R, type
msconfig, and press Enter. - Click over to the Boot tab at the top of the window.
- You will see a list of all detected Windows boot environments across your connected drives.
- Click on the operating system partition located on your new drive.
- Click the Set as default button situated beneath the list box.
- Click Apply, then OK, and restart your system to confirm the new default load order.
Troubleshooting Common Boot Drive Issues
Despite following setup steps carefully, hardware upgrades can occasionally run into minor roadblocks. Here is how to handle the three most common boot issues in Windows 11:
1. The New SSD Does Not Appear in the BIOS Boot Priority List
If your newly installed M.2 NVMe SSD or SATA drive isn’t listed under your motherboard’s boot priorities, verify the physical and logical settings:
- Physical Connections: Re-seat the M.2 stick firmly into its slot at a 45-degree angle before screwing it down. If using a SATA drive, verify both the SATA data cable and the power cable running from the PSU are firmly connected.
- Partition Format Conflict: Older drives formatted using MBR (Master Boot Record) will not display under pure UEFI boot menus. You can convert MBR drives to GPT using the command-line tool
mbr2gpt /convert /allowFullOSwithin an elevated Command Prompt window.
2. PC Keeps Booting Into the Old Operating System Drive
If your machine continues to ignore your new drive despite changing settings in BIOS:
- Residual Boot Managers: If your old drive still sits inside the machine, its original EFI System Partition might still take precedence. Once you are 100% certain your new drive contains all your backed-up data and works independently, back up your old drive and use Disk Management to wipe or reformat the old disk partitions.
- Isolate the New Drive: Shut down the computer, temporarily disconnect the SATA/NVMe power or data line from the old drive, and try booting with only the new drive installed. Once the motherboard registers the new bootloader on its own, you can reconnect the secondary drive.
3. “Inaccessible Boot Device” Blue Screen Error
This Stop Code typically appears when the motherboard’s storage controller mode doesn’t match the storage controller driver expected by the operating system:
- Check your BIOS settings under Storage Configuration or SATA Mode. Ensure the mode is toggled to AHCI (or NVMe/PCIe native mode) rather than legacy IDE or misconfigured RAID/VMD arrays unless you explicitly built a spanned drive array.
Frequently Asked Questions
Can I change my boot drive in Windows 11 without losing my data?
Yes. Changing the physical boot order in BIOS or shifting startup defaults inside Windows does not alter, format, or delete any files stored on your hard drives. However, if you perform a clean installation of Windows 11 onto a drive instead of cloning, the installer will overwrite the data on that specific target partition.
What is the difference between BIOS Boot Priority and Windows Boot Manager?
BIOS/UEFI Boot Priority dictates the physical hardware sequence your motherboard checks for startup code upon receiving power. Windows Boot Manager is an internal software bootloader stored inside a dedicated EFI partition. Modern UEFI motherboards display “Windows Boot Manager (Drive Name)” directly inside the BIOS list, which is the exact entry you should assign as Boot Option #1.
Should I disconnect my old hard drive when setting up a new SSD boot drive?
While not strictly required, temporarily disconnecting your old secondary drive during a fresh Windows 11 installation is considered a best practice. It prevents the Windows installer from accidentally writing the new system’s EFI boot partition onto the old drive instead of your new SSD.
How do I verify that Windows 11 is running off my new drive?
Press Windows Key + R, type diskmgmt.msc, and press Enter. In the Disk Management window, locate the disk that contains the partition labeled (C:). Next to (C:), you should see the tags Boot, Page File, Crash Dump, Primary Partition. Whichever physical disk holds the (C:) volume is your current active boot drive.
Conclusion
Upgrading your system’s storage performance is one of the most effective ways to boost overall speed in Windows 11. By using Windows Advanced Recovery settings or hitting native motherboard hotkeys, setting your new SSD or M.2 NVMe drive to Boot Option #1 ensures lightning-fast boot times, instant app responsiveness, and a smooth daily computing experience.
