
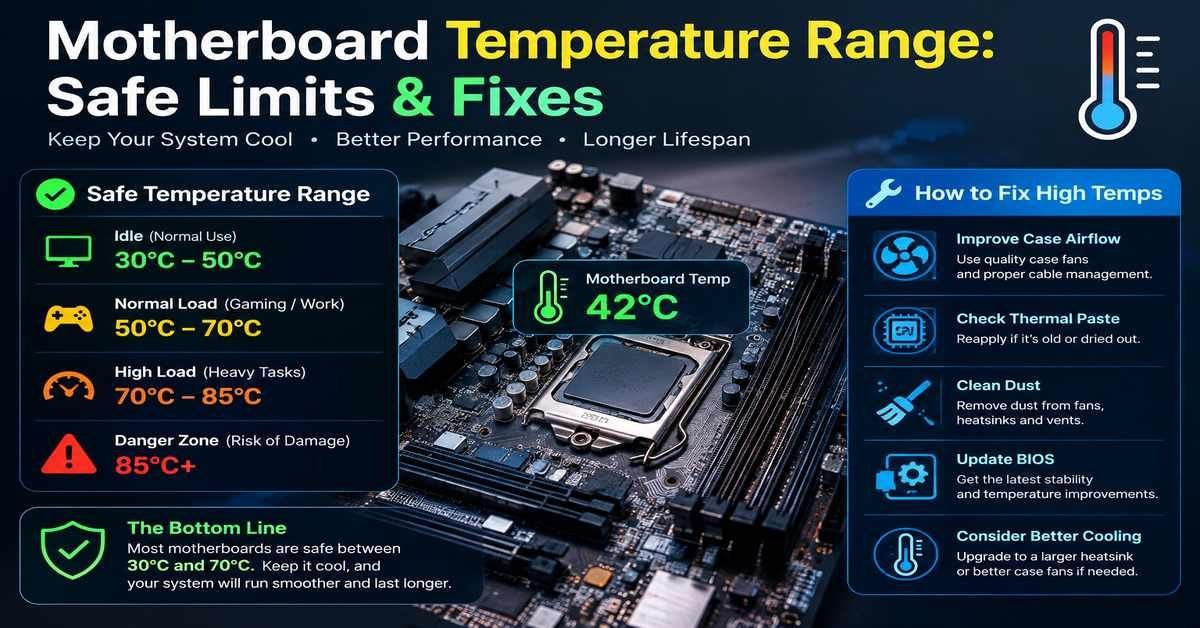
Your motherboard has no single temperature. It has several, and each one has its own safe range. Most people check one number in a monitoring app, panic or relax, and never learn which sensor they were reading.
This guide breaks down the normal motherboard temperature range for every heat zone on the board, explains what the sensor readings mean, and walks through fixes when things run hot.
Quick Answer: Normal Motherboard Temperature Range
For the general “Motherboard” or “System” sensor, 86°F to 131°F (30°C to 55°C) is normal. That covers idle through gaming or heavy work. Sustained readings above 140°F (60°C) deserve a look, and anything at or above 158°F (70°C) needs action.
Room temperature matters here. A board in a 78°F (26°C) room will read higher than the same board in a 68°F (20°C) room, so judge your numbers against your ambient temperature, not against a forum screenshot.
Why “Motherboard Temperature” Is Confusing
The motherboard is not one heat source. It’s a circuit board that hosts several hot components, and monitoring software may label them in ways that don’t match reality.
Here’s what you may see in tools like HWiNFO64, HWMonitor, or your BIOS:
- Motherboard / System / SYSTIN: A thermistor placed somewhere on the PCB, often near the CPU socket or chipset. Placement varies by manufacturer.
- Chipset (PCH): The chip that manages USB, SATA, and PCIe lanes.
- VRM / MOS: The voltage regulator module that feeds power to your CPU.
- CPU socket: Some boards report a separate reading right at the socket.
Not every reading is real. Cheaper boards sometimes report a fixed value, such as a flat 30°C that never changes, or a nonsense number like 0°C or 127°C. If a sensor never moves, ignore it.
Motherboard Temperature Ranges by Component
Use this table as a working reference. Exact limits vary by board and chipset, so treat the numbers as practical guidelines rather than manufacturer specs.
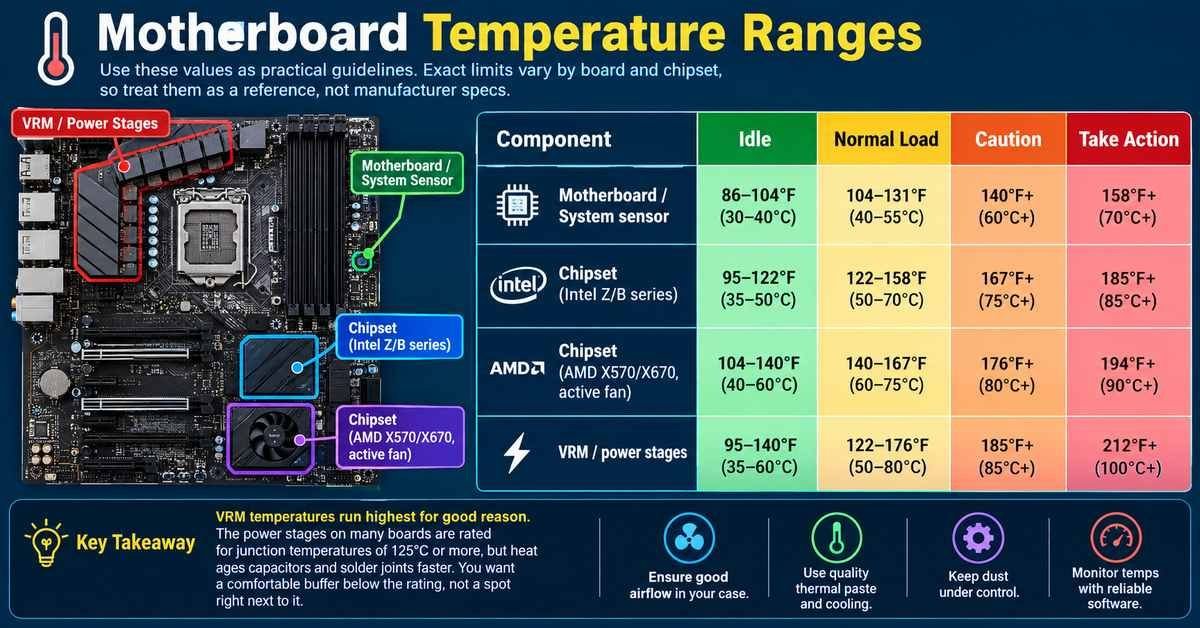
| Component | Idle | Normal Load | Caution | Take Action |
| Motherboard / System sensor | 86–104°F (30–40°C) | 104–131°F (40–55°C) | 140°F+ (60°C+) | 158°F+ (70°C+) |
| Chipset (Intel Z/B series) | 95–122°F (35–50°C) | 122–158°F (50–70°C) | 167°F+ (75°C+) | 185°F+ (85°C+) |
| Chipset (AMD X570/X670, active fan) | 104–140°F (40–60°C) | 140–167°F (60–75°C) | 176°F+ (80°C+) | 194°F+ (90°C+) |
| VRM / power stages | 95–140°F (35–60°C) | 122–176°F (50–80°C) | 185°F+ (85°C+) | 212°F+ (100°C+) |
VRM temperatures run highest for good reason. The power stages on many boards are rated for junction temperatures of 125°C or more, but heat ages capacitors and solder joints faster. You want a comfortable buffer below the rating, not a spot right next to it.
What Happens When a Motherboard Gets Too Hot
Motherboards rarely fail dramatically from heat. The damage builds slowly, and the early symptoms are easy to blame on something else.
Watch for these warning signs:
- Random crashes or reboots, especially under load
- CPU throttling, where performance drops because the VRM or CPU can’t stay cool
- Blue screens with no software cause
- USB or PCIe devices dropping out intermittently
- A faint burning smell or visible discoloration around the VRM area
- Fans suddenly ramping to maximum for no obvious reason
Long-term heat also wears out components. Electrolytic capacitors dry out faster at higher temperatures, and repeated thermal cycling stresses solder joints. A board that runs 20°F cooler generally lasts longer.
What Makes a Motherboard Run Hot?
Most heat problems come from a handful of causes. Check these before buying anything.
Poor Case Airflow
The VRM and chipset sit in the middle of the case. If air doesn’t move across them, heat has nowhere to go. A case with one exhaust fan and no intake is the classic culprit.
Overclocking and Power Limits
Higher clock speeds mean more current through the VRM, and heat rises faster than performance does. Some boards also ship with motherboard-default power limits that let the CPU pull far more power than the official spec, which heats the VRM.
Weak VRM Cooling on Budget Boards
Entry-level boards often have small heatsinks or none at all on the power stages. Pair one with a high-core-count CPU and the VRM works hard with little cooling.
Dust Buildup
Dust insulates. A layer on heatsinks and fans traps heat and blocks airflow. Systems that sit on the floor or near pets clog quickly.
Hot GPU and M.2 Drives
A high-end graphics card dumps a lot of heat into the case, and M.2 NVMe drives mounted under the GPU or without heatsinks add more. All of it warms the surrounding board.
High Ambient Temperature
A stuffy room, a desk cabinet, or a summer heat wave raises every reading in the system.
How to Check Your Motherboard Temperature
Use a monitoring tool that shows individual sensors, not just the CPU.
- Download HWiNFO64 (free). Run it in “sensors-only” mode.
- Find the motherboard section. Look for entries labeled Motherboard, System, VRM, or PCH.
- Record idle temperatures after 10 minutes of leaving the PC alone.
- Run a load test such as a demanding game or a stress test for 15 to 20 minutes.
- Note the maximum values and compare them against the table above.
- Cross-check in the BIOS, which often shows system and CPU temperatures without any software overhead.
Tip: Core Temp and similar apps only show CPU cores. They won’t tell you anything about the board.
How to Lower Motherboard Temperatures: Step-by-Step Troubleshooting
Work through these in order. The early steps are free.
Step 1: Clean the System
Power down, unplug, and use compressed air on heatsinks, fans, and filters. Hold fan blades still so they don’t overspin. Do this every few months.
Step 2: Fix Airflow
Aim for a clear path: cool air in from the front and bottom, hot air out the back and top. Slightly more intake than exhaust keeps positive pressure, which reduces dust entry.
Step 3: Check Fan Curves
Fans set to silent profiles often don’t spin fast enough until temperatures are already high. Adjust the curve in the BIOS or with your board’s fan software so case fans ramp earlier.
Step 4: Update the BIOS
Manufacturers release updates that adjust power delivery, fan control, and sensor behavior. Read the release notes first, and follow the manufacturer’s flashing instructions exactly.
Step 5: Reduce Power Limits or Undervolt
If the VRM runs hot under load, lower the CPU’s power limits or apply a modest undervolt. Many users lose very little performance and drop several degrees.
Step 6: Improve VRM Cooling
Add a small fan aimed at the VRM heatsink, or replace thermal pads if the board allows it. Avoid modifying heatsinks unless you know your board’s warranty terms.
Step 7: Reconsider Your CPU Cooler
An all-in-one liquid cooler can lower CPU temperatures but removes the airflow a tower air cooler used to push across the VRM. If you switch, add airflow near the socket.
See More: Notebook RAM vs Desktop RAM: Which One Do You Need?
Cooling Options Compared
| Fix | Cost | Effectiveness | Pros | Cons |
| Cleaning dust | Free | Moderate | Instant, no risk | Needs repeating |
| Extra case fans | $10–$40 | High | Cheap, helps everything | Adds noise |
| VRM-directed fan | $10–$25 | High for VRM | Targets the hotspot | Needs mounting space |
| Undervolt / power limits | Free | High | Lowers heat at the source | Requires BIOS tuning |
| New case with better airflow | $60–$150 | Very high | Fixes the root cause | Rebuild required |
| Upgraded motherboard | $150+ | High for VRM | Better power delivery | Costly, full reinstall |
Quick Troubleshooting Checklist
- [ ] Compared readings against room temperature
- [ ] Confirmed the sensor is actually changing, not stuck
- [ ] Cleaned dust from fans, filters, and heatsinks
- [ ] Verified front intake and rear/top exhaust fans spin the right direction
- [ ] Raised case fan speeds in the BIOS
- [ ] Updated the BIOS after reading release notes
- [ ] Checked CPU power limits and overclock settings
- [ ] Confirmed M.2 drives and the GPU aren’t cooking the board area
- [ ] Re-tested under load after each change
When to Worry
Stay calm if readings peak briefly. A short spike during a game load is normal. Concern begins when temperatures stay high for long stretches, or when symptoms like crashes and throttling appear alongside them.
Act quickly if:
- The board smells burnt or has discolored spots
- The system shuts down under load
- The VRM reading approaches 212°F (100°C)
- Temperatures climbed suddenly with no change in workload
If you’ve cleaned, fixed airflow, and adjusted settings but the board still runs hot, the problem may be a failing fan, a poorly seated cooler, or a faulty sensor. A technician or the manufacturer’s support can help narrow it down.
FAQs
What is the acceptable temperature range for a motherboard?
The acceptable range for the main motherboard (system) sensor is 86°F to 131°F (30°C to 55°C). That covers idle through gaming.
Readings from 140°F to 157°F (60°C to 69°C) are worth watching. Sustained readings at or above 158°F (70°C) mean you should improve airflow or cooling.
Other board sensors run hotter and are still fine. The chipset can reach 158°F to 185°F (70°C to 85°C), and VRMs can reach about 185°F (85°C) under heavy load.
Is 72 degrees too hot for a CPU?
72°C (162°F) is not too hot for a CPU under load. Most modern CPUs run safely up to about 90°C to 95°C (194°F to 203°F) before they throttle. Gaming or rendering at 72°C is normal.
At idle, 72°C is too high. An idle CPU should sit around 95°F to 140°F (35°C to 60°C). If yours idles at 72°C, check that the cooler is seated properly, the thermal paste is applied, and the fans are spinning.
If you meant 72°F, that’s room temperature and nothing to worry about.
Is 70 degrees hot for a motherboard?
It depends on the sensor and the unit.
- 70°C (158°F) on the main motherboard/system sensor is too hot for sustained use. It points to poor case airflow or heavy overclocking.
- 70°C on the VRM or chipset sensor is normal. These components are built to run hot.
- 70°F (21°C) is perfectly cool.
Check which sensor you’re reading before you worry.
Is 120 degrees too hot for a CPU?
It depends on the unit.
- 120°F (49°C) is fine. It’s a normal idle or light-use temperature.
- 120°C (248°F) is far beyond safe limits. Most CPUs have a maximum junction temperature of 100°C to 105°C and will throttle or shut down long before 120°C. A reading this high usually means a faulty sensor or software glitch. If the PC really is that hot, shut it down immediately.
Is 200 degrees too hot for a CPU?
It depends on the unit.
- 200°F (93°C) is too hot for sustained use. It’s right at the throttling point for most CPUs. A brief spike during a heavy load isn’t dangerous, but if it’s constant, upgrade the cooler, clean out dust, or improve case airflow.
- 200°C (392°F) is not possible on a working CPU. The chip would shut itself down first. You’re looking at a sensor error or a bad monitoring reading.
Quick Reference
| Reading | Celsius | Fahrenheit | Verdict for a CPU |
| Room-temp reading | 22°C | 72°F | Cool, nothing to worry about |
| 72 degrees (Celsius) | 72°C | 162°F | Normal under load, high at idle |
| 120 degrees (Fahrenheit) | 49°C | 120°F | Normal |
| 200 degrees (Fahrenheit) | 93°C | 200°F | Too hot for sustained use |
| 120 degrees (Celsius) | 120°C | 248°F | Dangerous or a false reading |
| 200 degrees (Celsius) | 200°C | 392°F | Impossible, sensor error |
